
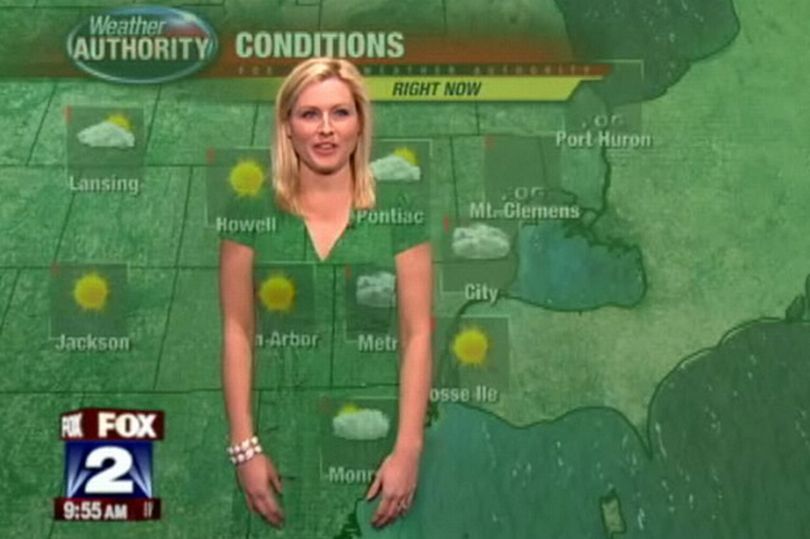
Chroma keying - or blue/green screen matting - is a process of removing a specific color from the video to be replaced with another picture or video. Historically green or blue colors were used as a background because they are not dominant in human skin or clothes. However, when a weather forecaster puts on a green skirt it can lead to funny situations:
Chroma keying became very popular technique not only on TV but in the movies. It’s just much cheaper to film in a studio and add desired background later in post-production while keeping the resulting picture very plausible:
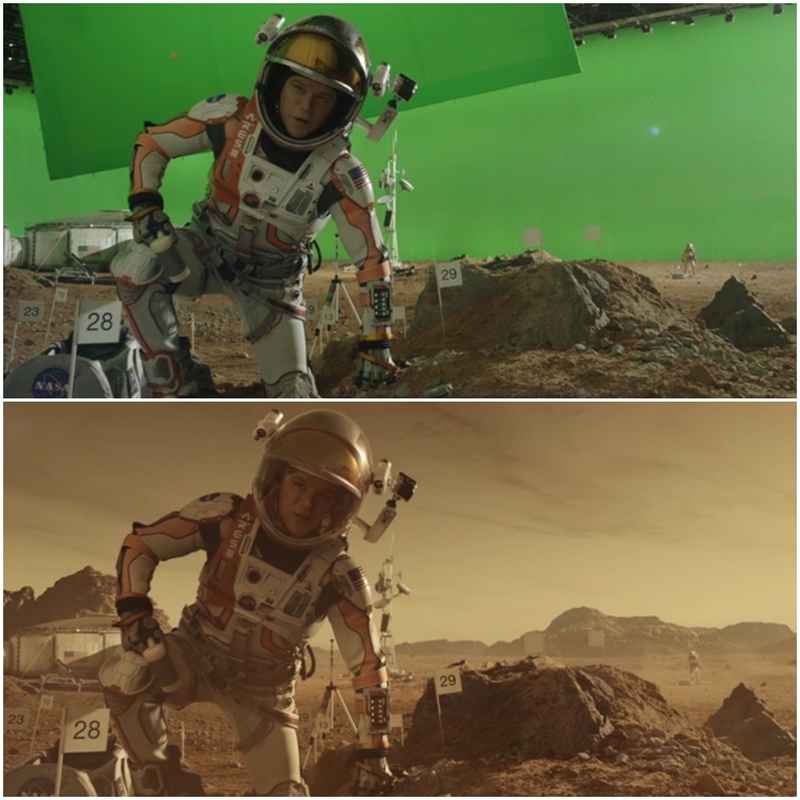
The Martian by Ridley Scott
Matting problem
The naive approach to green screen matting - I’ll go on with green instead of blue from now on - is to just go through the video frame, check if a pixel a pure green - [0, 0, 255] in RGB notation - and replace it with a pixel from the desired background.
It works most of the time but fails in a region near the object’s edge. And I refer to the object as something we film which is in the foreground of the video frame. Pixels near this edge cannot be classified as either foreground - that belongs to the object, or a green background. It’s caused by a number of factors.
First of which is a motion blur. Camera sensors have a finite shutter speed, so a given pixel is a sum of actual image over time. Next factor is a camera resolution. There might be objects in the picture such as hair or fur that are much smaller than camera can capture. Next factor is transparency.
So for that pixels we can say that they are partially foreground and partially background. And it can be expressed mathematically as I = alpha*F + (1-alpha)*B. Where I, B and F are vectors in RGB space that depend on a position in the image - I(x, y) = [I_RED(x, y), I_GREEN(x, y), I_BLUE(x, y). And alpha is a scalar and also dependents on the position - alpha(x, y).
B and F in this formula are background and foreground images. In pixels where alpha = 0 we see background, and when alpha=1 it’s a foreground.
For each pixel there are 3 linear equations - one for each color channel - and 7 unknowns - alpha, B_RED, B_GREEN, B_BLUE and F_RED, F_GREEN and F_BLUE. It means that we cannot analytically find the solution for it.
But luckily for producing a final picture we don’t need to know the exact solution, but the one that just looks nice.
Vlahos algorithm
Petro Vlahos was an engineer and inventor, who defined the problem and found a solution for it. His original film solution is called the color-difference technique. He was honored in 1995 with an Academy Award for lifetime achievement, shared with his son Paul.

Vlahos made one observation essential to his work: green screen matting is performed on foreground subjects for which the green is related to the blue by G ≤ a2*B. The usual range allowed by his technique is .5 ≤ a2 ≤ 1.5.
The Vlahos formula alpha can be represented as
alpha = 1 – a1*(I_GREEN – a2*I_BLUE) where a1 and a2 are tunable parameters. There are a number of refinements to this formula that yield better results, but let’s see how it can be implemented in the simplest form with OpenCV.
OpenCV implementation
I’m going to use some free videos with green background and apply Vlahos algorithms to add a custom background from an image.
So first of all a bunch of includes from OpenCV (I’m using version 4.4.0 here):
#include <iostream> // for standard I/O
#include <string>   // for strings
#include <opencv2/core.hpp>     // Basic OpenCV structures (cv::Mat)
#include <opencv2/videoio.hpp>  // Video write
#include <opencv2/imgcodecs.hpp>
#include <opencv2/imgproc.hpp>
using namespace std;
using namespace cv;
Then in the main I expect to receive some command line arguments - path to video file, path to background image and a1, a2 parameters:
if (argc != 5)
   {
       cout << "Not enough parameters" << endl;
       return -1;
   }

const string source = argv[1];
const string background = argv[2];
const float a1 = atof(argv[3]);
const float a2 = atof(argv[4]);
Opening a video in OpenCV is achieved with VideoCapture. After constructing of an object I can check if video was actually opened with method isOpened(). If it failed - the program just exits.
After the input video file is opened, I get the size of the picture and a video codec code. The former will be used for the output video file:
VideoCapture inputVideo(source);
if (!inputVideo.isOpened())
{
   cout  << "Could not open the input video: " << source << endl;
   return -1;
}

Size S = Size((int) inputVideo.get(CAP_PROP_FRAME_WIDTH),
               (int) inputVideo.get(CAP_PROP_FRAME_HEIGHT));
int ex = static_cast<int>(inputVideo.get(CAP_PROP_FOURCC));
Then I need to open output video with VideoWriter. But the first thing is to construct a filename for it. And after opening a file I also check is if was successful with isOpened() and exit if it wasn’t.
string::size_type pAt = source.find_last_of('.');
const string outputFileName = source.substr(0, pAt) + "_with_bg.avi";
VideoWriter outputVideo;
outputVideo.open(outputFileName, ex, inputVideo.get(CAP_PROP_FPS), S, true);
if (!outputVideo.isOpened())
{
   cout  << "Could not open the output video for write: " << outputFileName << endl;
   return -1;
}
Next comes opening the background image with imread. It gives a OpenCV matrix - Mat class. After opening the image and usual check, I’m going to convert and scale it.
Images in video frames in this code are matrices. Each element of a matrix has a type like CV_8UC3. All the types in OpenCV are prefixed with CV_. Then comes a numerical type - source image pixels are 8-bit unsigned integers (8U code) and range from 0 to 255. And each pixel has 3 channels (red, green, blue), hence C3 in the end.
I’ll convert integers to 32-bit floats and scale them so they are in range from 0 to 1, dividing them by 255. I’ll do that with channels of the video as well so it’s easier to work with alpha.
Mat img = imread(background, IMREAD_COLOR);
if(img.empty())
{
   std::cout << "Could not read the image: " << background << endl;
   return 1;
}
img.convertTo(img, CV_32FC3, 1.0/255);
Now let’s instantiate some variables:
Mat src, res_front, res_back, res;

vector<Mat> channels, img_channels;

Mat alpha = Mat::zeros(S, CV_32F);
src will hold a frame from input video. res_front will hold frames with alpha applied and res_back for 1-alpha applied to background image.
channel and img_channels vectors to hold an image - frame of the input video and background image respectively - decomposed into 3 channels. So the vector size will always be 3 with 0 element for blue, 1 for green and 2 for red channel.
alpha is the map to calculate. It’s the same size as the video (and I picked background with matched size), and single channel with 32-bit float type.
Then comes the main loop:
for(;;) {
   inputVideo >> src;
   if (src.empty()) break;
   src.convertTo(src, CV_32F, 1.0/255);
First I get a frame from input video. If it’s empty it means that the end of the video is reached. Next comes the same conversion as with background image - cast to float and scale to [0, 1].
OpenCV has a helper method to split 3 channel matrices to a vector of 3 single channels:
split(src, channels);
split(img, img_channels);
It may be suboptimal to split static image in this loop - definitely an area to think about later.
Now let’s calculate alpha using Vlahos form:
       alpha = Scalar::all(1.0) - a1*(channels[1] - a2*channels[0]);

       // keep alpha in [0, 1] range
       threshold(alpha, alpha, 1, 1, THRESH_TRUNC);
       threshold(-1*alpha, alpha, 0, 0, THRESH_TRUNC);
       alpha = -1 * alpha;
I use different channels of the input video in the form, and that’s why the split above. I’m using threshold helper method to clamp alpha value to be in [0, 1] range.
Now when I have alpha for a frame I can apply it to every channel:
for (int i=0; i < 3; ++i) {
   multiply(alpha, channels[i], channels[i]);
   multiply(Scalar::all(1.0) - alpha, img_channels[i], img_channels[i]);
}
Here element-wise multiplication is used when multiplying alpha by input image channel and 1-alpha for background image channel.
After I have all the channels I’m going to merge them into 3-channel result matrices for front and back separately:
   merge(channels, res_front);
   merge(img_channels, res_back);
The last piece is to produce the final frame by summing front and back, converting to 8-bit int and scaling back:
   res = res_front + res_back;
   res.convertTo(res, CV_8UC3, 255);
   outputVideo << res;
The last line here writes the frame to output video file.
I got a couple of static footage of cities with sky replaced with green. And I also found some more complex cases with dancing people with all the motion blur, hair fuzziness and transparency. I’ve tried to vary a1 and a2 input parameters until I got bored, leaving some green glow here and there: