
One way to upload files using Flask is to literally create a route that accepts HTTP POST and saves bytes received on the disk.
And with horizontal scaling you need to mount an external storage to every running instance that supports replication.
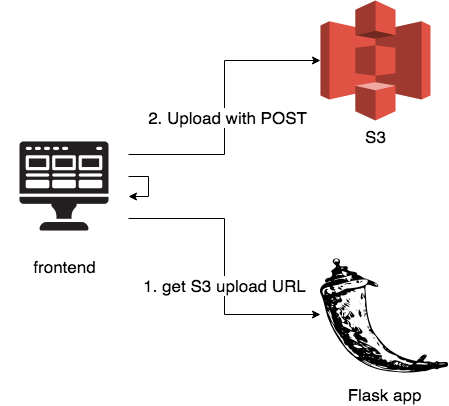
Another option is to use object storage - like AWS S3 - and upload files directly from the frontend. In that case Flask will have a route that just generates and URL a frontend will upload to. In that case files are not consumed by Flask.
First, create a Bucket using AWS CLI:
~ aws s3 mb s3://flask-s3-upload
make_bucket: flask-s3-upload
You won’t be able to create your bucket with the same name as they must be unique between all AWS users.
Then you need to apply a CORS configuration, since frontend calls S3 directly. Open AWS console, find your bucket, navigate to Bucket Permissions -> CORS configuration and put the following XML:
<?xml version="1.0" encoding="UTF-8"?>
<CORSConfiguration xmlns="http://s3.amazonaws.com/doc/2006-03-01/">
<CORSRule>
    <AllowedOrigin>*</AllowedOrigin>
    <AllowedMethod>POST</AllowedMethod>
    <MaxAgeSeconds>3000</MaxAgeSeconds>
    <AllowedHeader>Authorization</AllowedHeader>
</CORSRule>
<CORSRule>
    <AllowedOrigin>*</AllowedOrigin>
    <AllowedMethod>POST</AllowedMethod>
    <AllowedHeader>*</AllowedHeader>
</CORSRule>
<CORSRule>
    <AllowedOrigin>*</AllowedOrigin>
    <AllowedMethod>GET</AllowedMethod>
    <AllowedHeader>*</AllowedHeader>
</CORSRule>
</CORSConfiguration>
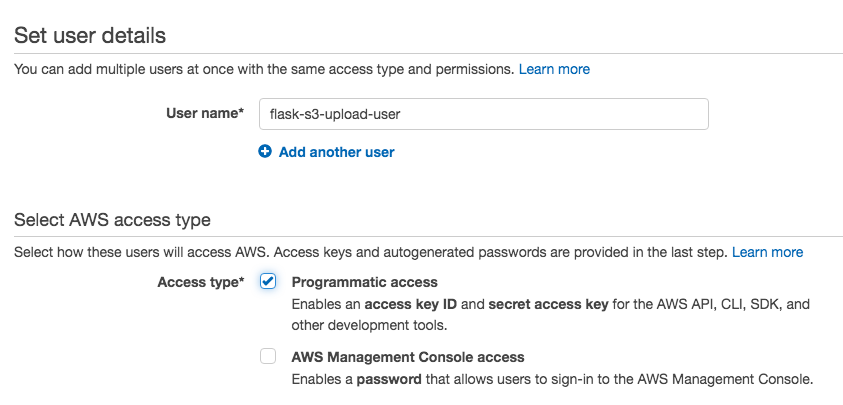
Next you need to create a user that a code in the Flask app will use to generate upload URL. Follow these steps:
- Go to AWS IAM and create a user
- Create a user with programmatic access:
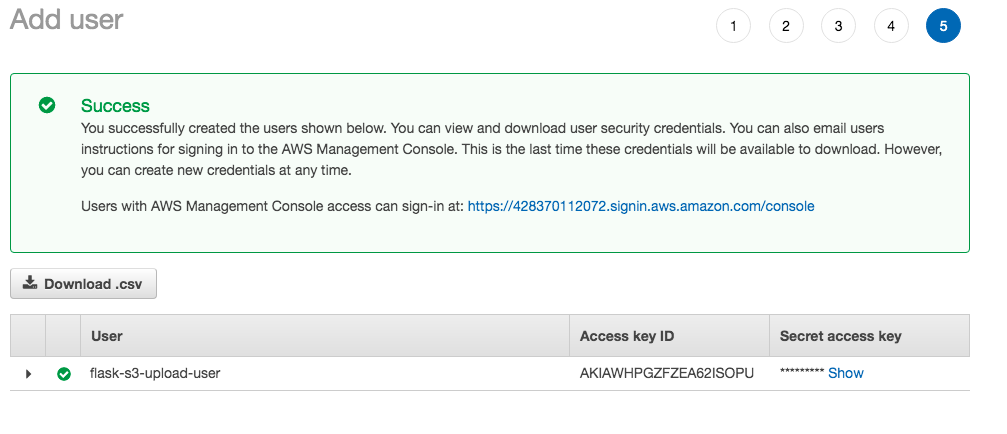
- In the last 5th screen copy access key and secret access key:
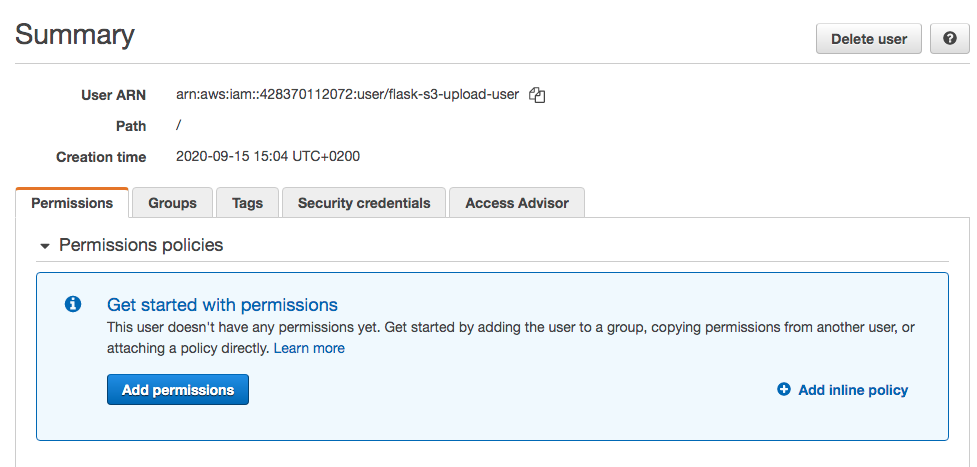
- When the user is create add inline policy:
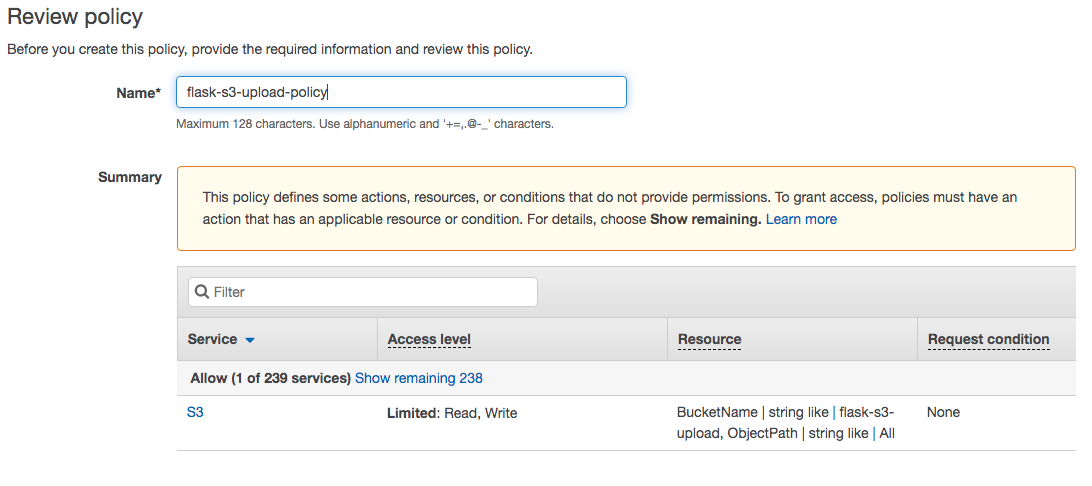
In the summary click add inline policy and add the following policy as a json:
{
    "Version": "2012-10-17",
    "Statement": [
        {
            "Effect": "Allow",
            "Action": [
                "s3:PutObject",
                "s3:GetObject",
                "s3:AbortMultipartUpload",
                "s3:PutBucketCORS"
            ],
            "Resource": "arn:aws:s3:::flask-s3-upload/*"
        }
    ]
}
- By the end you’ll see a user with proper permissions created:
Now, create 2 Flask routes. First will just serve the frontend. Second is an API that generates data frontend use to upload file to S3:
@app.route('/')
def index():
    return render_template('index.html')


def sanitize_filename(filename): # (1)
    for sep in ('/', '\\'):
        if sep in filename:
            filename = filename.split(sep)[-1]
    filename = secure_filename(filename)
    return filename


@app.route('/upload_url')
def upload_url():
    filename = sanitize_filename(request.args.get('upload_file'))
    s3_client = boto3.client('s3', # (2)
                             aws_access_key_id='AKIAWHPGZFZEA62ISOPU',
                             aws_secret_access_key='E58Jx8yM078rY3XXXXXXXXXXX')
    upload_data = s3_client.generate_presigned_post('flask-s3-upload', # (3)
                                                    filename,
                                                    ExpiresIn=3600)
    return jsonify(upload_data)
- Extract safe filename from parameters, received from frontend
- Init boto3 client with credentials from the user created above
- Call
generate_presigned_postof the boto3 client providing filename and bucket name
Then, create the frontend code. Don’t throw rotten tomatoes, but I’m using jQuery here (I do backend mostly). In this first part there is only a HTML form:
<!DOCTYPE html>
<html lang="en">
<head>
    <meta charset="UTF-8">
    <title>Title</title>

</head>
<body>
<form id="upload_form">
    <input type="file" id="upload_file" name="upload_file" class="custom-file-input" required/>
</div>
<input type="submit" id="submitBtn" name="submit" class="btn btn-dark btn-block" value="Upload" />

</form>
<script src="https://code.jquery.com/jquery-3.2.1.min.js" integrity="sha384-xBuQ/xzmlsLoJpyjoggmTEz8OWUFM0/RC5BsqQBDX2v5cMvDHcMakNTNrHIW2I5f" crossorigin="anonymous"></script>
Then here comes a couple of AJAX calls:
<script>
$("#upload_form").submit(function(event){
event.preventDefault();

$.ajax({url: "http://localhost:5000/upload_url", // (1)
        type: "GET",
        crossDomain: true,
        data: {
            upload_file: $("#upload_file").val()
        },
        success: function(result) {

            var formData = new FormData(); // (2)
            formData.append("key", result["fields"]["key"]);
            formData.append("AWSAccessKeyId", result["fields"]["AWSAccessKeyId"]);
            formData.append("policy", result["fields"]["policy"]);
            formData.append("signature", result["fields"]["signature"]);
            formData.append("file", $("#upload_file").get()[0].files[0]);

            $.ajax({url : result["url"], // (3)
                    type : "POST",
                    data : formData,
                    contentType: false,
                    processData: false,
                    success : function(result) {
                        alert("File uploaded");
                    },
                    error: function(error) {
                        alert("Upload failed :(");
                    }
            });
        },
        error: function(error) {
            alert("cannot start uploading :( try again later");
        }
});
});
</script>
- AJAX call to the Flask app to get URL and other data needed to upload a file to S3
- Create a form and populate it with the data received from Flask
- Final AJAX to AWS S3 with the file itself